¶ The external optimizer
The external optimizer tool lets the user optimize LAS file(s) outside the PCS software. The user can optimize a single file, multiple files, a single folder or folders with subfolders, LAS and LAZ files. The optimized LAZ file will be optimized after unzipping.
¶ Versions after 2025.09.09
The external optimizer got a general refresh with the version 2025.04.17, which refurbished the UI and also fixed a lot of mechanics, and made the tool easier to use.
After the start of the external optimizer, the user can see the user interface. The description of the functions and buttons is the following:
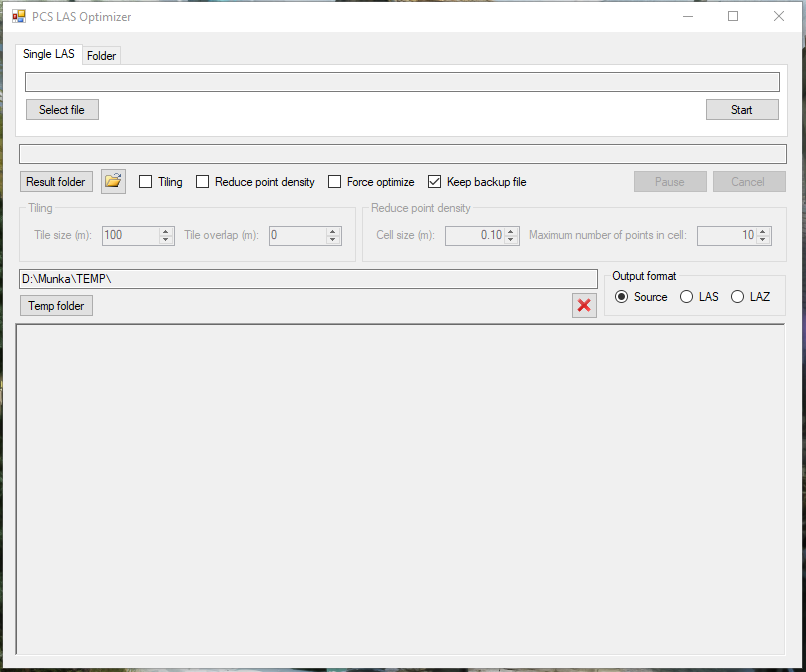
- Single LAS/Folder tab - These tabs can control whether a single file or a complete folder (optionally subfolders) shall be optimized. Select the required tab
- Single LAS - Select file - Select a single LAS or LAZ file for optimization, and press Start for processing the file
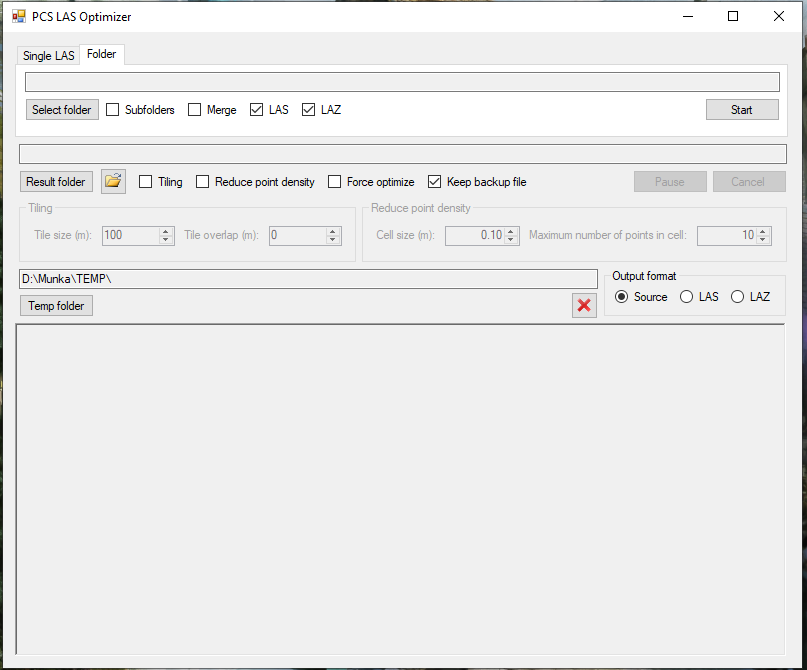
- Folder - Select folder - Select a folder in which the files will be optimized
- Folder - Subfolders - Select this checkbox if the optimizer shall process the subfolders within the selected folder
- Folder - Merge - Merge the input to a single output file.
- LAS/LAZ checkboxes - These checkboxes control which files shall be processed. If both checked, the optimizer processes the LAS and the LAZ files, if only the LAS, only the LAS files will be processed. Use Start after the settings are made to start processing
- Result folder - Empty, when started, and automatically assigned to the source folder after selecting a file or folder for optimization. Using the button, the user can redirect the output files to a different result folder if needed
- Show in explorer - Open a file explorer for the result location
- Tiling - Select this checkbox, and the optimizer performs the tiling on the data, and the tiling settings will be available. Tiling will split the input cloud(s) into smaller tiles based on user settings below. The resulting files will be named after the bottom left corner's coordinate and the tile size (526150_180600_50.las would refer to x:526150 y:180600 tile size 50x50 m)
- Reduce density - Select this checkbox, and the optimizer performs density reduction on the data, and the reduce density settings will be available. The reduce density tool performs a voxel-based reduction in point density according to user specifications below
- Force reoptimize - The tool can perform repeated optimization on clouds which are already optimized to fix errors
- Keep backup file - The optimizer will generate the .BAK files are a backup of the original LAS files. Renaming the BAK file to LAS will result in an original version of the file. The BAK file occupies the same amount of space as the source file. If turned off, the optimizer will prompt the user if he/she sure about not keeping the backup files.
- Pause/Cancel - The Pause and Cancel buttons are stoping the optimization process. The process will calculate the actual file (if multiple files are selected). Using the Pause will also finish the current file process and put the process on hold.
- Tiling settings - Specify the tile size and the overlap between the tiles
- Reduce density settings - Specify the voxel size and the maximum points within the voxel
- Temp Folder - The default temp folder based on environmental variables. It is highly recommended to ensure it points to an SSD drive, where a sufficient amount of free space is available during bigger datasets optimization
- Clear Console - Clear the log from the existing messages
- Output format - Select the output format, which can be the same as the source (LAS or LAZ, depending on the original selection), or LAZ or LAS (independently from the source format).
- Console - The log will be written here. System messages are grey/black, successful optimization messages are green, warnings, - which do not affect the optimization - are yellow/orange, and failed optimization warnings are red.
Versions between 2025.04.16 and 2025.09.09 might contain fewer functions, but those versions are not discussed here.
¶ Versions before 2025.04.16
Please note that depending on your license level, the optimizer might not contain some features.

After the start of the external optimizer, the user can see the user interface. The description of the functions and buttons are the following:
- Single file optimizer area, a single LAS file can be selected for optimization.
- Select the single LAS/LAZ file to be optimized - to select the LAZ file, enter *.laz to the file name, press enter, and then the browse window will present the LAZ files as well.
- Select the output folder for the optimized LAS file
- Start the optimization process
- Select a folder - and if applicable - check the Subfolders checkbox. The optimizer will go through the folder and optimize all LAS files inside and if checked, all subfolders as well. This option will optimize the LAZ files as well.
- Specify the TEMP folder. The software will store the temporary files in this folder. It is highly recommended to set this folder prior to optimizing bigger files, as the default TEMP drive - if it's not set elsewhere in the environmental variables - is set to C drive, and the temporary file(s) can occupy the same size as the LAS files themself.
- Result folder - Specify an output folder for the Tiled/Reduced density output.
- Cancel the current progress.
- Tile output checkbox - If it's checked, the input LAS files will be tiled according to the tile size settings. The tiles will be created in a folder next to the LAS file with the same folder name as the LAS file itself (if not specified elsewhere). The tile names will refer to the bottom left corner's whole coordinate and the size of the tiles in meters (526150_180600_50.las would refer to x:526150 y:180600 tile size 50x50 m)
- Tile size setting. The tile will be square, so the user shall define a single dimension.
- Tile overlap - The user can set an overlap, and the tiles will be overlapping with the specified meters
- Force reoptimize - In case the user needs to reoptimize a cloud, this checkbox can be selected.
- Reduce density function - It allows the users to reduce the density of the initial files by checking the checkbox.
- Cell size - The user can specify a cell (voxel) in space within which the software will understand the density reduction
- Maximum number of points in cell - The user can specify the maximum number of points per cell.
- Log area - The progress messages will be printed in this area.
- Progress bar
¶ Trivia
- The use of the external optimizer counts as user-day
- The optimizer might not appear in the tray sometimes, so after it has been started it might be needed to ALT+TAB over the windows to reach it. - Only for older versions.
- If the optimizer fails to read/optimize the LAS file, most probably, the header of the LAS is faulty, or the file is corrupted (like a broken download). In these cases please run a las2las on the file and try again the optimizing process.
- If the user optimizes LAZ files, the required temporary space might be bigger.
- The optimizer runs on multiple CPU cores. On a weaker PC, it might consume most of the hardware resources during the optimization process. The optimization is assembled from multiple steps, and not all steps load the PC in the same way.
- Older versions of the optimizer would create .bak files, which have the same size as the original LAS file. These are backup files. If the optimized LAS file is corrupted or the user needs the original file, those files can be renamed to .las, and it will result in the original LAS files. In 99% of the cases, just delete these .bak files as they occupy a lot of disk space.
- The optimizer reaches the best performance if the cloud is located on an SSD drive and the TEMP folder also points to an SSD drive. Using HDD will drastically reduce the performance.
¶ Known bugs
- If the user quickly presses the Start button twice, it may happen that the optimizing progress will be started twice. If the user cancels the progress in these cases, restart it, and use the force reoptimize option as well to avoid faulty optimization.
- If the user uses the admin role to start the tool, the network drives might not be visible. Even if the creator of the network drive and the admin user are the same, Windows will handle these separately. To see the network drives, start the tool without an admin role.