¶ Class Filter Window
The Class Filter Window is the control panel of the classification visualization. The user can turn on or off classes in this panel for 2D and 3D windows, customize the colours for the classes, rename the classes (for the software), and save/load the current settings. The Class Filter Window is dockable like the 2D/3D Windows or attribute tables. To change the point cloud colouring to classification, use the Point Cloud Toolbar. The Class Filter Window can be accessed from the Standard Toolbar or Point Cloud Toolbar.
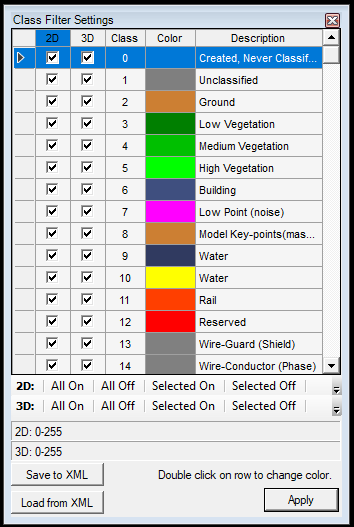
The control panel displays a sheet for all classes (0-255). Each row represents a single class, with the class number (the number stored inside the LAS file), the colour (assigned by the software), and the description of the class (also assigned by the software; the name is not stored in the LAS file). The 2D and 3D column checkboxes show if a class is turned off or on for the selected view. The user can uncheck or check each class for each view so that the users can set their settings. Below the sheet part, there is a 2D and 3D row containing four buttons: All On - Turn all classes on for 2D/3D window, All Off - Turn all classes off for 2D/3D window, Selected On - Turn selected records on for 2D/3D window, Selected Off - Turn selected records off for 2D/3D window. To select a record, select the first field in the sheet before the 2D column, where the black triangle is presented in the image above. The user can select multiple classes by holding the CTRL or SHIFT buttons. The currently turned-on classes are shown in 2D and 3D below the buttons. In the given example, all classes (0-255) are turned on for 2D and 3D windows.
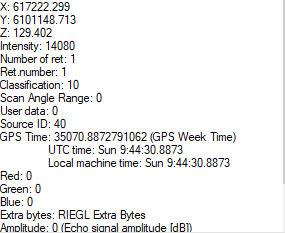
The user can save the current settings (on/off settings, colours for classes, assigned names) to an XML format and load these settings from the XML. This can be useful if the user has a specific setting that might need to be transferred to another PC. Always press Apply to apply changes; closing the panel will discard the changes. To change the colour or name, double-left-click on the field. The software assigns different colours for the commonly used classes (0-12); the rest can be grey or black. Please check if a used class is black, as in this case, the cloud might not be visible in the view(s) if you use classification colouring. To check a point's class, use the Information button at the Measure Toolbar, and after clicking on a point cloud point, the information will present the class value for the selected point. See the example below.
Please note that the classification might not be appended to your LAS file. It is common for TLS or MLS sensors that the point cloud comes out as non-classified from the post-processing environment (all points have a 0 or 1 class). It is widespread for ALS sensors to have minimum ground classification, but building and vegetation classes are also common. Classification can be prepared in a post-processing environment, between post-processing and extraction, or inside PCS. Read more about classification tools in the classification toolbar article.